Easy Ichigo Daifuku (Strawberry Mochi with Red Bean Paste)
Strawberry daifuku (or ichigo daifuku) is a popular dessert in Japan and is surprisingly easy to make. It consists of a strawberry wrapped in red bean paste (a.k.a. anko) and covered in soft, chewy mochi. Classic daifuku mochi is also naturally vegan and gluten free! Edit: This was one of my first blog posts back in 2019. I’ve recently updated this post with a better recipe and photos!
What is Daifuku?
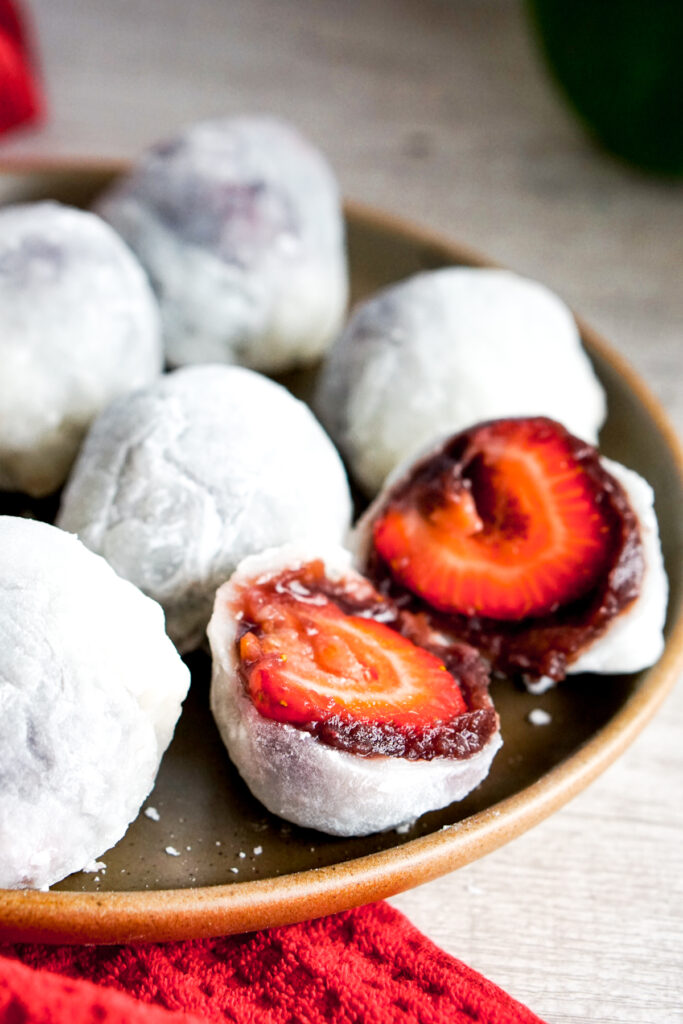
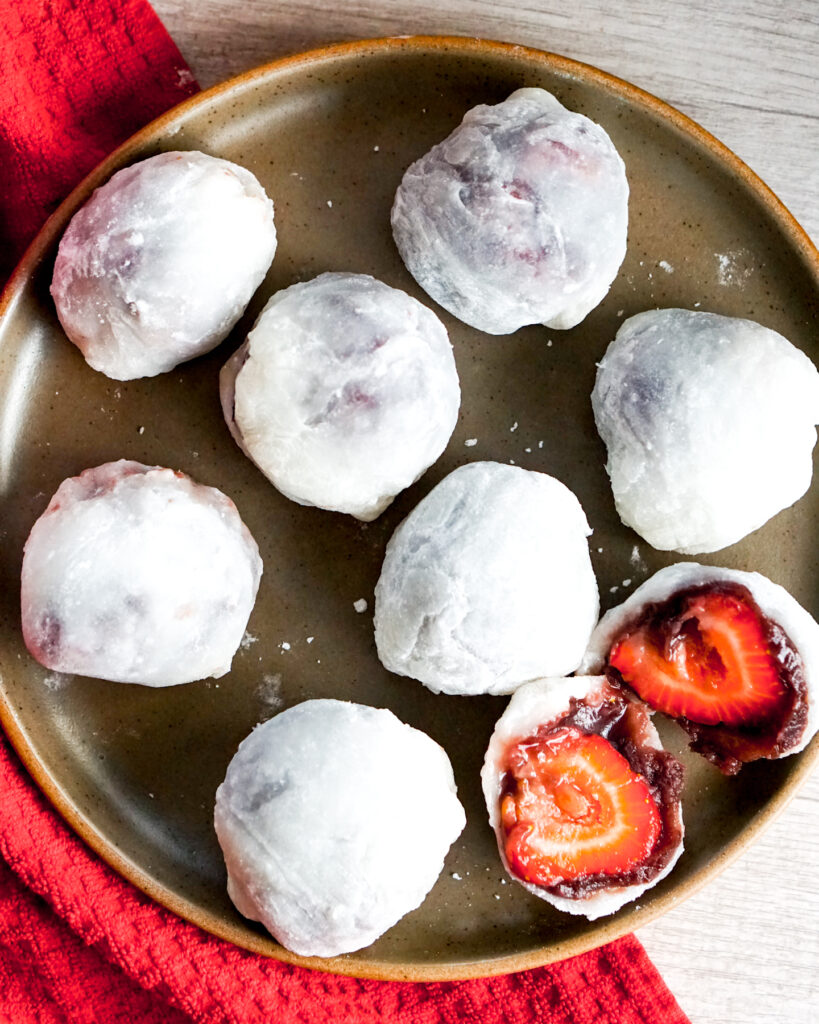
Daifuku is a traditional Japanese dessert made of balls of mochi stuffed with some sort of filling. At the most basic level, daifuku is mochi stuffed with just red bean. However, ichigo daifuku is also very common. Ichigo daifuku is strawberries covered in a red bean paste and wrapped in mochi dough. There are many recipes out there for ichigo daifuku, but I developed this one to MAXIMIZE convenience. It uses a whole pack of shiratamako and can be made in the microwave! I know these kinds of traditional Japanese sweets can look intimidating to make for the first time, so trust me when I say that this is the recipe you’ll want to start with.
Ingredients for Daifuku Mochi
Daifuku consists of three main parts: the strawberry, the red bean paste, and the mochi. The strawberry component is pretty self explanatory. The only tip I have is to try and get medium sized strawberries, so they fit in the mochi. Does anyone else besides me feel like American grocery stores sell GIGANTIC strawberries? Like how is that even possible? What kind of fertilizer are they using?
Red Bean Paste for Daifuku
For the red bean paste, I used a store bought koshi an. The word “an” refers to “anko,” which is the Japanese word for red bean paste. There are actually different types of an, which describe how smooth or thick and chunky it is – just like peanut butter! Koshi an is the smooth red bean paste. Tsubu an is the more thick and chunky bean paste. If you’re going the classic route and stuffing your mochi with only red bean paste, I probably would recommend using the chunky consistency. For wrapping strawberries, though, I just prefer the smooth style koshi an.
I also have used a homemade red bean paste in the past, and I have to say, it is MUCH better. On the flip side, making red bean paste at home does take quite some time. If you’ve got a pressure cooker, you can at least cut down on the time it takes to boil the beans. My own anko recipe is still in development, so stay tuned!
How to Get the Softest Mochi – Use Shiratamako Instead of Mochiko
The last ingredient component in the daifuku is the actual mochi dough. Daifuku mochi should consist of only three ingredients: glutinous rice flour, water, and sugar.
There are lots of food bloggers and recipe TikTokers out there these days who make daifuku with coconut milk or butter mixed into their mochi dough. While I’m sure it tastes fine, that’s much more complicated than it needs to be. A traditional Japanese daifuku mochi recipe uses only water, sugar, and glutinous rice flour.
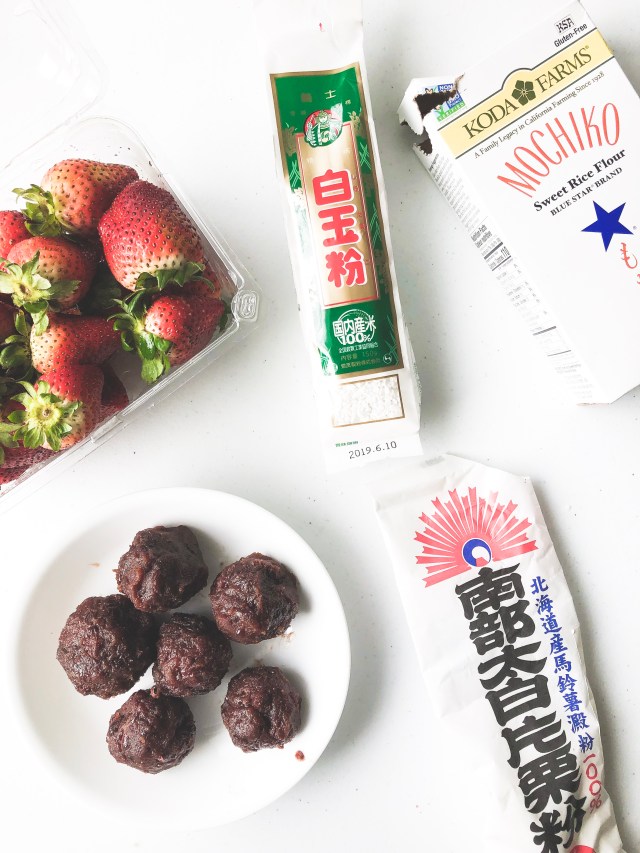
Speaking of glutinous rice flour, for the softest mochi, you’ll want to use shiratamako, not mochiko. Both shiratamako and mochiko are made from the same glutinous mochi rice grain. The difference between shiratamako and mochiko is that they are ground differently: mochiko is ground when dry and shiratamako when wet. The result is that shiratamako produces a smoother, softer, stretchier texture than mochiko. I’ve found that with shiratamako, the mochi dough stays soft even after it’s cooled a little. With mochiko, you need to make the daifuku while the mochi is still hot – as hot as your hands can handle! If you’re a beginner, for that reason I recommend shiratamako. However, grinding shiratamako is more complicated, and therefore more expensive. It’s also harder to find.
Can I Substitute Mochiko for Shiratamako?
Absolutely! Mochiko will still give you the soft, chewy texture of mochi that you want in daifuku. Shiratamako is easier to work with and produces a softer texture. However, mochiko is definitely MUCH cheaper and much easier to find, even in non-Asian grocery stores.
Making Daifuku: Wrapping Strawberries with Red Bean
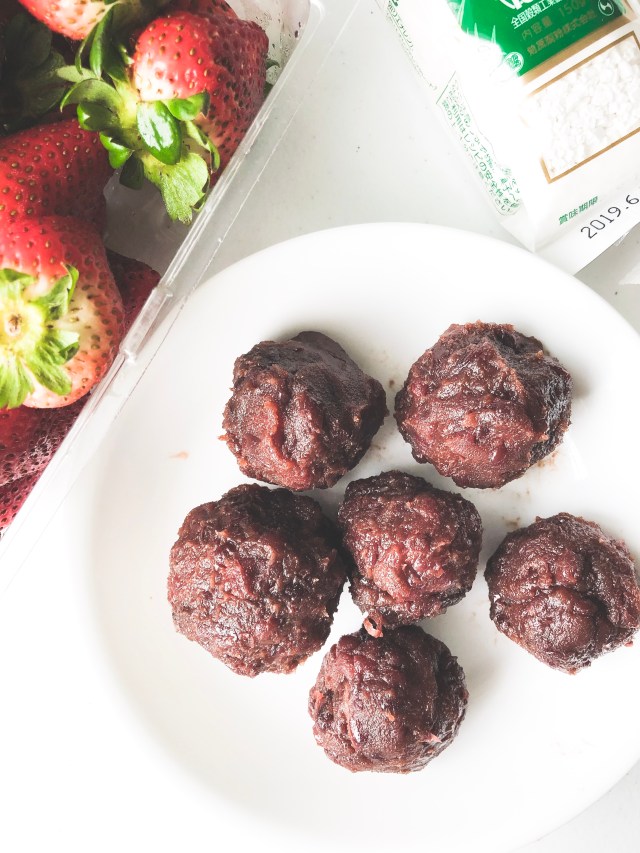
Now that you’ve got your ingredients, you’re ready to get cooking! The first step is to wrap your strawberry in red bean paste. I like to separate my red bean paste into even sized chunks, then roll into balls. Flatten each ball like a pancake, stick the strawberry in the middle, and mush the red bean all over. I know, it’s not very pretty or precise. When you’re done, I like to stick the balls in the fridge to make the red bean a little easier to handle for the mochi wrapping part.
Making Mochi in the Microwave vs. Steamer
With the strawberries wrapped, you’re ready to make your mochi dough. First, mix your sugar, mochiko or shiratamako, and water together. You have two options for making mochi: microwave or steamer. Microwave is obviously faster and easier, but if you don’t have one or if you’re not a fan of microwave cooking, you can steam it on stovetop.
Mochi in a Steamer:
Set up your steaming contraption. I often use a large skillet with a steamer rack inside. Or you can put your bowl of mochi into a bamboo steamer. Whatever works. Cover and steam for 15 minutes, or until the mochi turns translucent-ish all the way through. Steaming times may differ depending on the shape of your bowl. Kind of complicated, right? That’s why I like using the microwave.
Mochi in the Microwave:
Place your dish of wet mochi dough into the microwave. Cover tightly with some sort of cover, dish, or plastic wrap. Microwave on high for 2 and a half minutes, stirring once in the middle.
How to Keep Mochi From Sticking
Here’s a SUPER PRO TIP THAT I FEEL LIKE NOBODY DOES BUT EVERYONE SHOULD: To keep your mochi from sticking to the bowl WHILE it’s cooking, you can line the bowl with a wet cloth. Seriously. When it’s done cooking, just carefully (so you don’t burn yourself, okay?) plop the whole thing out. The wet cloth should peel off easily.
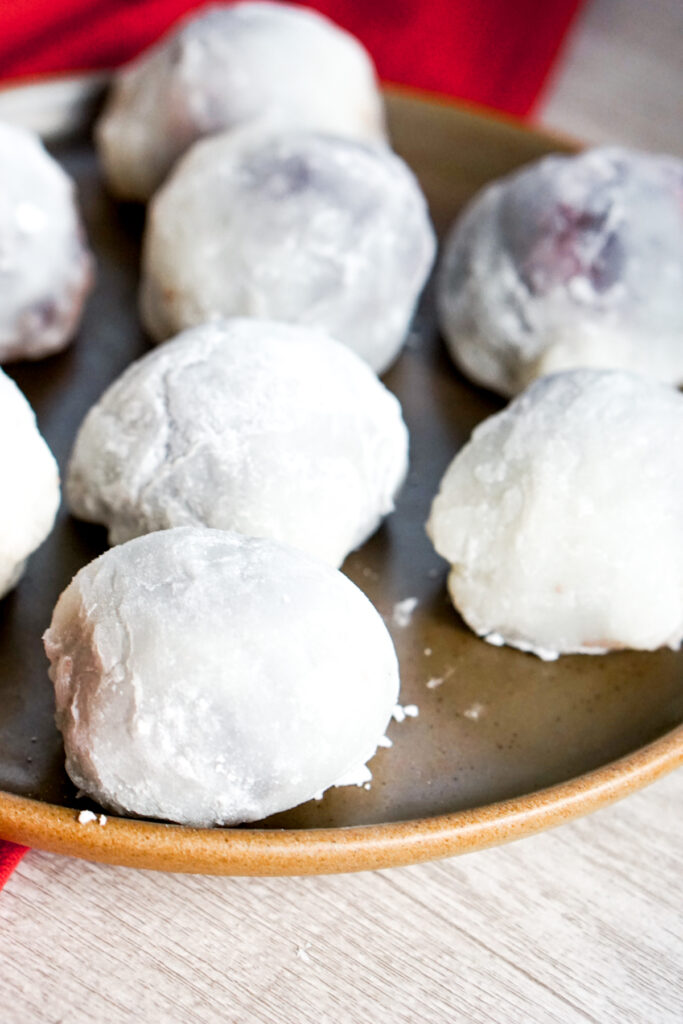
Now to keep mochi from sticking to your work surface AFTER it’s cooking, use katakuriko. Katakuriko is potato starch. You can find it at any Japanese market, or of course, online. A lot of people say you can substitute katakuriko with corn starch, which I guess, it technically true. But I feel like it tastes weird. If you’re wanting your mochi to TASTE like you got it from a mochi shop in Little Tokyo, use katakuriko.
Wrapping Mochi
I’m still not great at wrapping my daifuku. It’s the hardest part of this recipe, and I don’t know what else to tell you except to keep practicing. Here are some of my tips:
I like to roll out each piece of mochi with a fondant roller. Mochi doesn’t stick that much to plastic, which makes the fondant roller easy to use. When I use shiratamako instead of mochiko, though, I actually have no problem just flattening the dough by hand. Try to get the edges of the mochi thinner than the center.
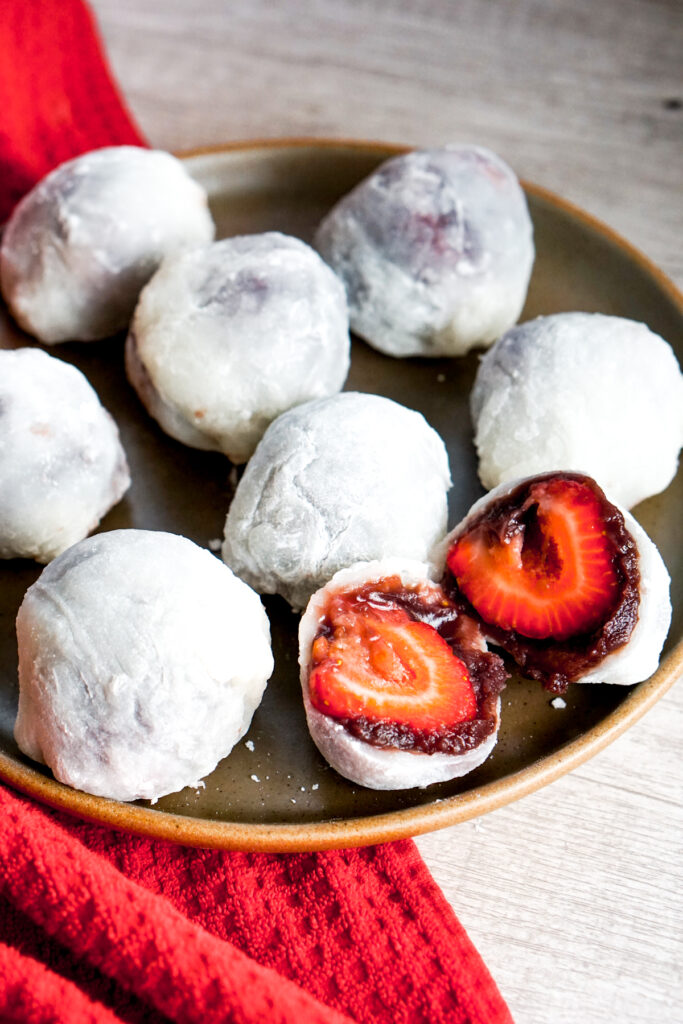
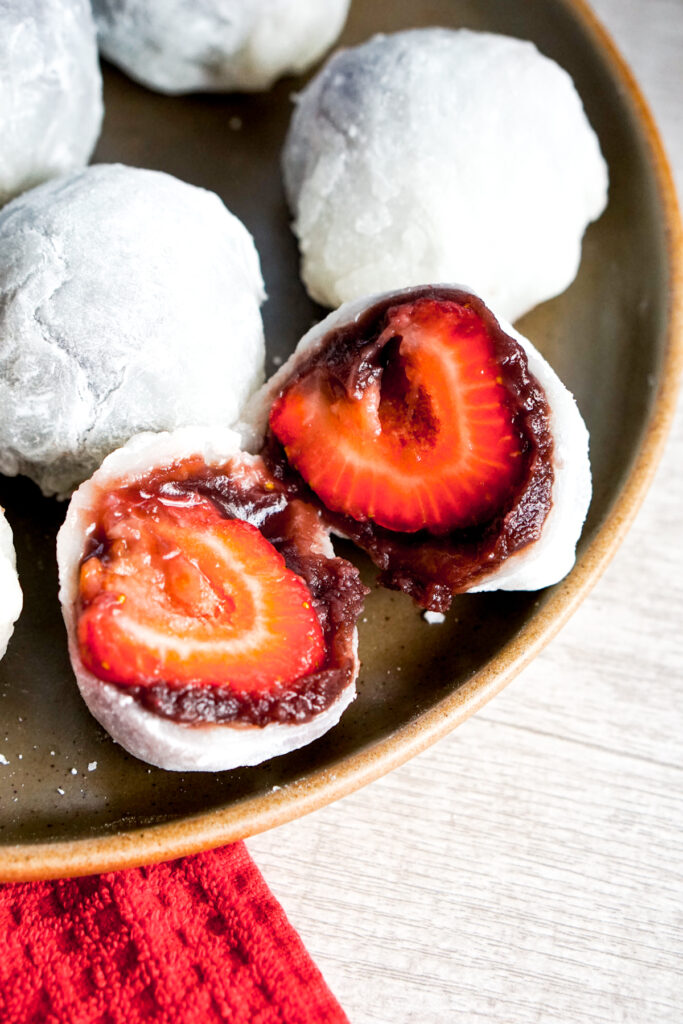
Make sure you flatten out your piece of mochi a little bigger than you think you might need. I place each strawberry/red bean ball onto the mochi with the point of the strawberry facing down. Then, fold the mochi over the top and pinch to seal.
If your daifuku looks lopsided or lumpy, try rolling it like a ball on the counter in katakuriko. Like the blood of Jesus, katakuriko covers all your sins.
More Unique Mochi Daifuku Recipes
That’s it! If you liked this recipe and are interested in getting creative with your mochi, try these other daifuku recipes with fun flavors:
Or for more easy mochi recipes, check out my chi chi dango and butter mochi recipes.
Easy Ichigo Daifuku (Strawberry Mochi with Red Bean)
Ingredients
- 150 g shiratamako (about 1 cup + 3 tbsp), can substitute mochiko
- 3 tbsp sugar
- 200 mL water, about 1 cup minus 2 tbsp
- 250 g red bean paste, about half a store bought package
- 9 strawberries, medium sized
- katakuriko (potato starch), as needed for dusting
Instructions
- Wash and cut leaves off strawberries. Make sure strawberries are dried off.
- Divide red bean paste into 9 chunks. Roll each chunk into a ball and flatten with your palm.
- Wrap each strawberry in red bean paste, forming a ball. Place red bean and strawberry balls in fridge while preparing the mochi.
- In a heat proof bowl, whisk together shiratamako and sugar.
- Add water, stirring with a silicone spatula until combined into a dough.
- Cover tightly with either a microwave lid or plastic wrap, then microwave for 2 and a half minutes, stirring once about halfway through. You'll know the mochi is cooked when it turns from opaque white to somewhat translucent all the way through.
- Scoop cooked mochi onto a surface dusted with katakuriko. Divide into 9 equal pieces.
- Working with one piece at a time, roll out into a flat, circular shape about 3 inches in diameter. Keep the unused pieces covered with a towel or plastic wrap to prevent them from drying out.
- Place a red bean/strawberry ball in the middle of your flattened mochi. Wrap the strawberry with the mochi, pinching the ends together to form a ball. Dust your finished daifuku with katakuriko as necessary to keep from sticking.
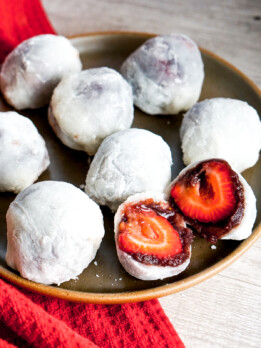
- Continue rolling and wrapping your daifuku until you've used all 9 pieces. Daifuku are best eaten the day they are made.

Pingback: Mint Chocolate Daifuku - Mint Mochi Covered Truffles | Mochi Mommy
Pingback: Strawberry Rose Daifuku | Mochi Mommy
Pingback: Easy Pork and Cabbage Gyoza (Japanese Dumplings) - Mochi Mommy
Pingback: Girls' Day Chi Chi Dango (Three Layer Mochi) - Mochi Mommy
Pingback: Daifuku Mochi with Strawberry on Top - Mochi Mommy
Pingback: The Ultimate Guide to Mochi - Mochi Mommy