Rainbow Mochi Recipe (Fugetsu-do Inspired)
Hello from Seattle, where we are in the middle of a “stay at home” order to combat the terrible COVID-19 pandemic. How are you guys doing? Staying in? Ready to bake? Okay, technically, this rainbow mochi recipe is steamed and not baked. But I thought we could use a fun and bright treat during a gloomy time. This rainbow mochi is also naturally gluten free and vegan! You know what that means – IT DOESN’T USE FLOUR! Because Lord knows it’s impossible to find flour at the grocery store these days. For more quarantine baking ideas, check out the #bakedinSeattle collaboration on instagram to see what my fellow PNW bakers are up to!
EDIT APRIL 2022: WOW look how much things have changed even since I first posted this recipe! After some reader feedback, I went back to this recipe to edit it to make it more user-friendly. It now uses only mochiko, has options for better shelf life, and includes instructions for making mochi in the microwave! I would still consider this a more “intermediate” mochi recipe, but feel free to give it a shot!
*Disclaimer: This post includes affiliate links; I may earn a commission on purchases you make.
Rainbow Mochi vs. Rainbow Suama
My rainbow mochi is actually inspired by the famous Little Tokyo LA mochi shop, Fugetsu-do. Fugetsu-do has been around for over 100 years! They have a rainbow suama and a rainbow dango. Here’s a super old Youtube video of it being made:
I don’t actually know Fugetsu-do’s recipe, but suama in Japan is made with joshinko, a non-glutinous rice flour. So it’s actually NOT mochi at all. It kind of looks like a log with a white center and colored exterior. If you’re interested, here’s another old Youtube video from a Japanese food show about suama.
In contrast, mochi is made from glutinous rice (which is a misnomer, because there’s still no gluten in it). Joshinko has a much firmer and chewier texture, which makes it good for treats like suama, which require kneading and shaping. Fugetsu-do describes their rainbow dango as being “mochi bites,” so I assume it’s made with some sort of mochi flour, unlike the suama.
Originally, I wrote this recipe to be a suama, with joshinko. However, I realized that most of my mochi-loving friends here in America have mochiko in their pantries. Mochiko is much more accessible and more widely used here in America, so I ended up adapting this recipe to be a mochi recipe. Sorry, suama. Maybe another day.
Mochi with Coconut Milk? Mochi in Japan vs. Hawai’i
Another edit I’ve made to this recipe is the optional addition of coconut milk. Typical mochi desserts in Japan are made with some sort of mochi flour (mochiko or shiratamako), sugar, and water. That’s it. If you want a mochi more true to its Japanese roots, that’s what you should use with this recipe as well.
HOWEVER, without any added fats, mochi made with just water, flour, and sugar tends to dry out VERY quickly. You’ll need to eat this mochi the day you make it. It also is a little harder to work with doing these fancy rainbow stripes.
On the other hand, mochi-type desserts in other countries sometimes add fats to their dough. I’ve seen a lot of Filipino glutinous rice desserts that use coconut milk as an added ingredient. If you’re familiar with mochi in Hawai’i, you’ll know that their famous mochi, called chi chi dango, is made with coconut milk too. I’ve even seen some Taiwanese cooks add butter to their mochi.
When adding coconut milk to this rainbow mochi recipe, the mochi did indeed stay moist for much longer. It tasted perfectly fine even a couple days later, after being stored at room temperature in an airtight container. The drawback to the coconut milk mochi was the the mochi was almost TOO soft. The little mochi pillows were more flat and floppy instead of holding a nice, round marshmallow-y shape like in these photos.
So in the end, I’m leaving it up to you to decide. If you want a firmer shape, more Japanese taste, and are willing to eat all your mochi in one sitting, then leave out the coconut milk. If you’re needing your mochi to last a little longer and don’t mind some oddly shaped little mochi blobs, go for the coconut milk.
Also, feel free to double the recipe! The pictures below were made using a doubled recipe.
Steaming Mochi vs. Microwave Mochi
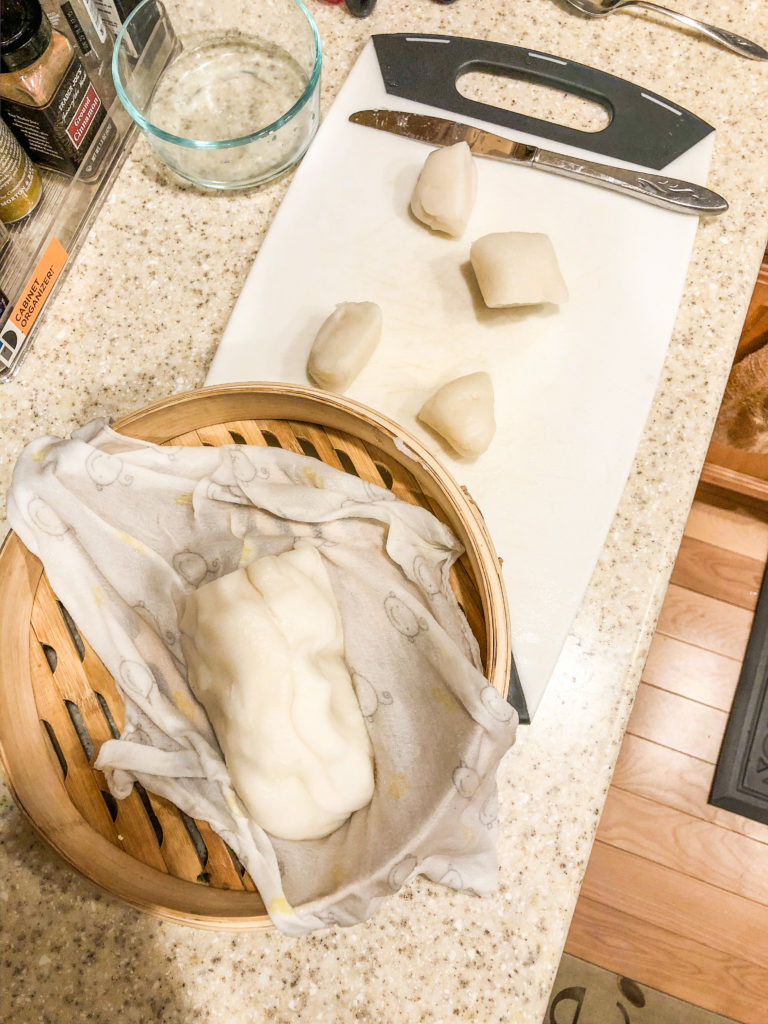
You have two options for making this mochi: steam or microwave. Based on personal experience and feedback from other mochi makers on Instagram, steaming tends to retain moisture much better than microwaving. If you are using water only (no coconut milk), I highly recommend steaming your mochi. You can check out some of my daifuku mochi recipes to see my various steaming contraptions. In the past, I’ve used a plate balanced on two chopsticks in a frying pan. I’ve also used a bamboo steamer perched on top of a pot. Really any steaming method works. But REMEMBER that steaming times may differ depending on what shape dish you use and what steaming method you use. 15 minutes has always worked fine for me, but if you’re not sure, simply tear off a tiny piece of mochi and taste it to check for doneness. If the mochi feels grainy, it’s not done.
Making mochi in the microwave is faster, easier and seems to be less prone to user error. Again, I recommend using a shallow dish so the mochi batter lays mostly flat and cooks evenly. Make sure that your dish in the microwave is WELL covered so your mochi doesn’t dry out. Like with steaming, microwave times will differ depending on your individual microwave, so the best way is to taste a little piece of mochi to check for doneness. I microwave for two minutes, then stir, then do another 30 seconds.
Mochi Hack: How to Keep Mochi from Sticking
Here’s a pro tip for BOTH steamed and microwaved mochi: the cooked mochi will not stick to a damp dishcloth. Lately, I’ve been lining my steamer with a wet dishcloth, and when it’s done I can just turn the mochi out.
Technique for Shaping the Rainbow Mochi
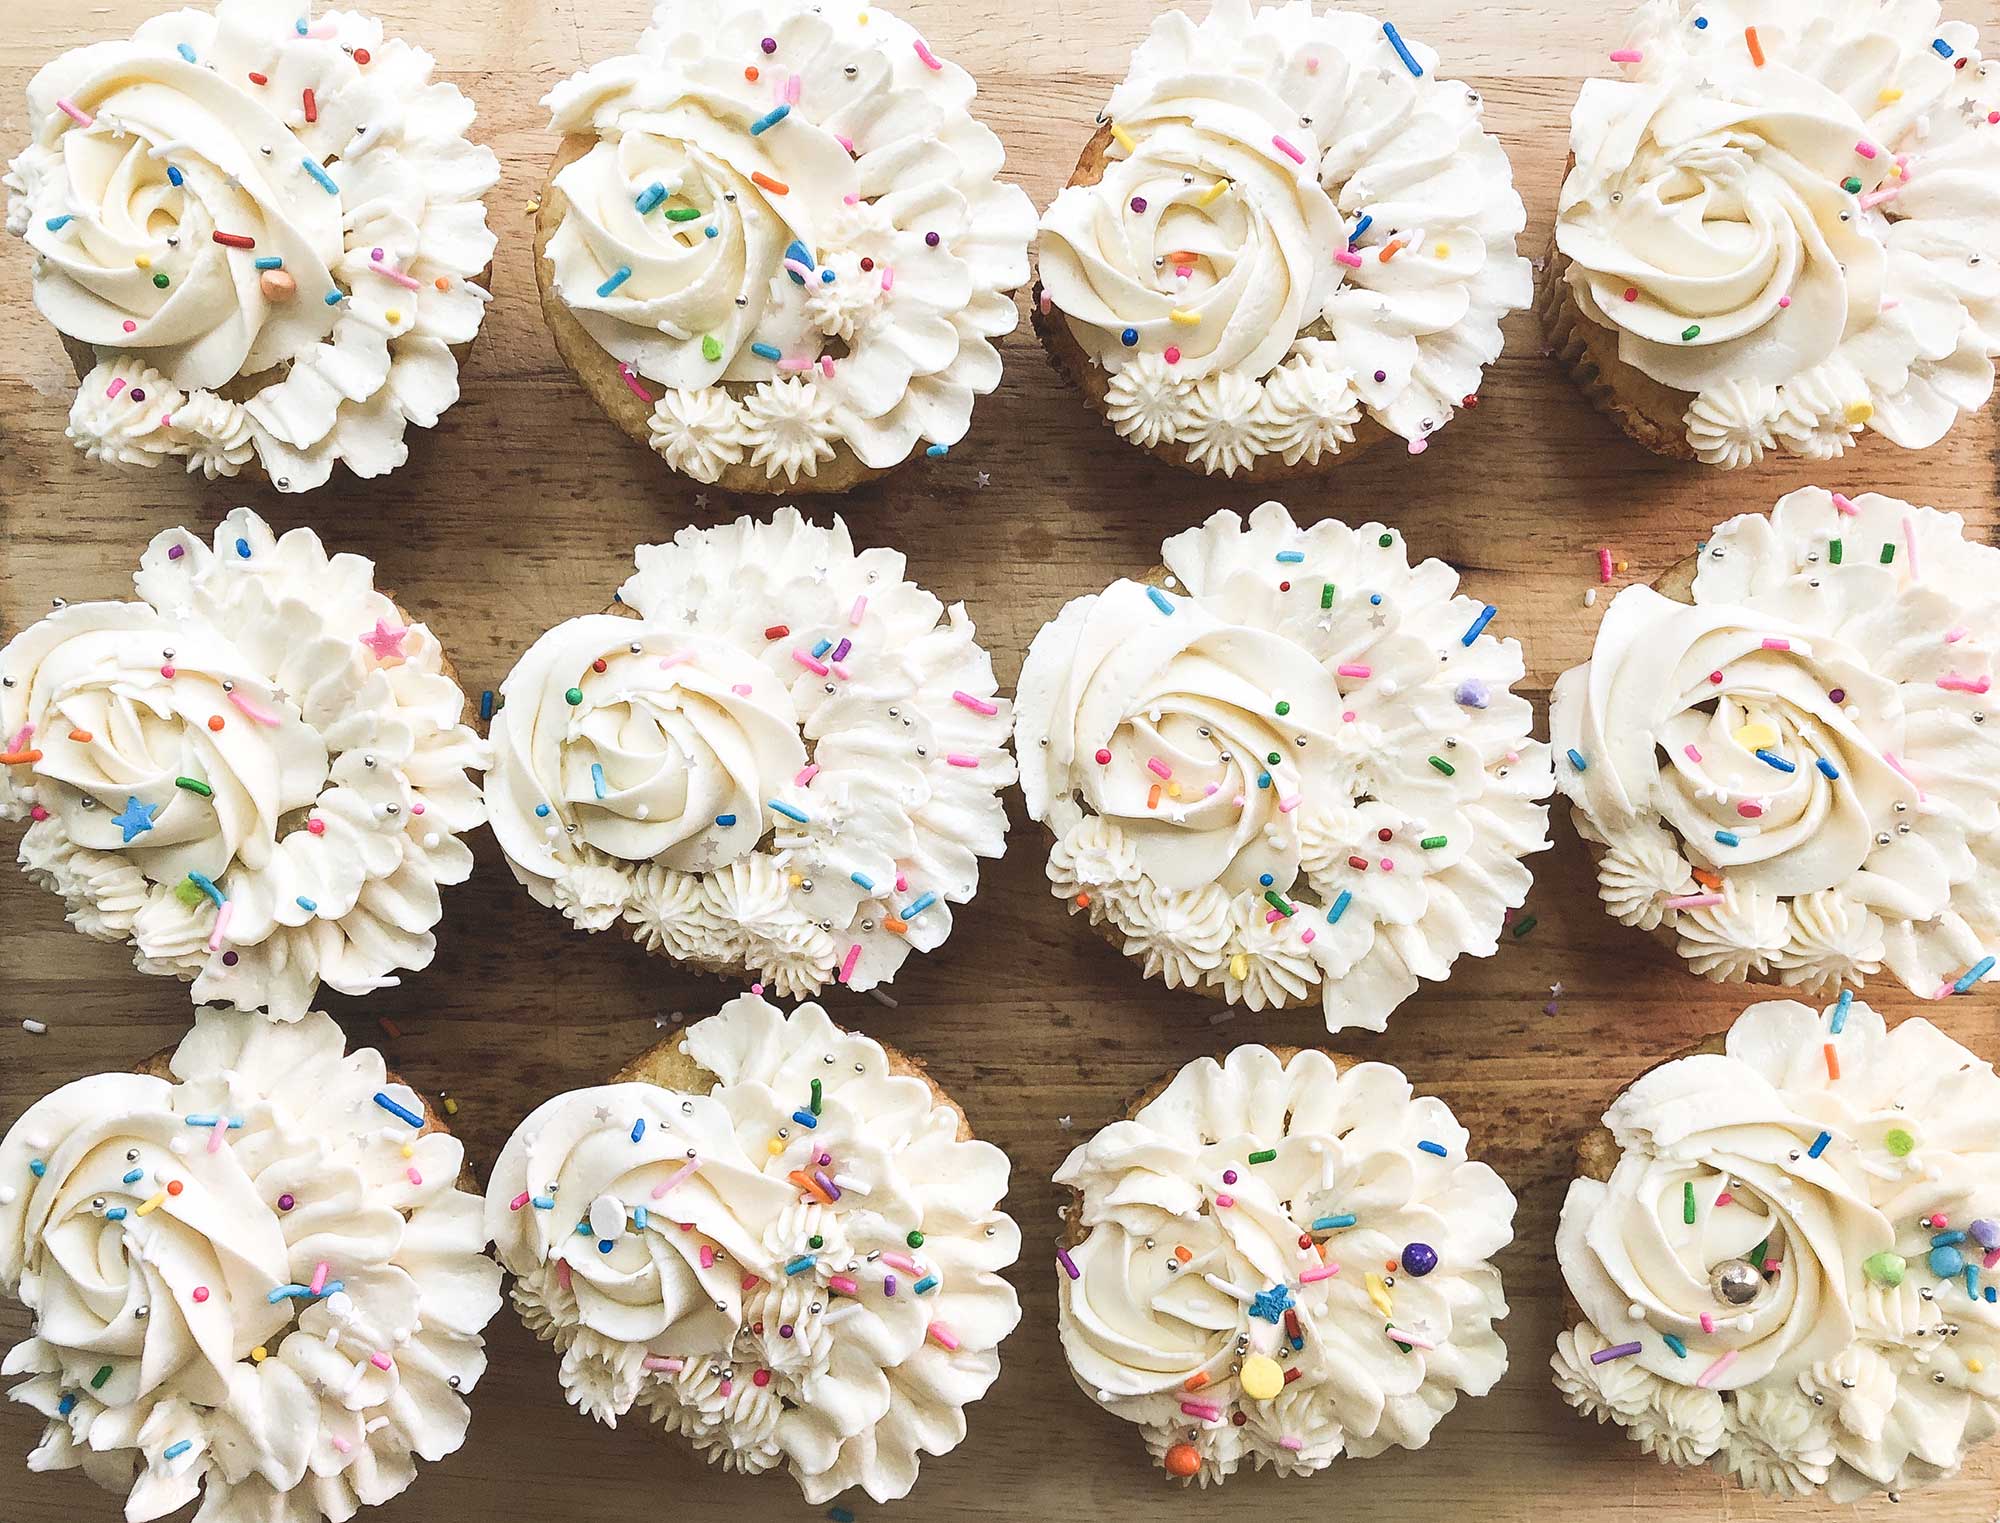
This is the tricky part. Make sure you have all your tools on hand before you start. Keep a bowl of water, your knife, your potato starch, and food coloring all within reach. Once you’ve got the cooked mochi, knead it into a log. Cut off 1/2 the log of mochi. Keep the remaining 1/2 chunk covered in the wet cloth so it doesn’t dry out. Split the first chunk into 4 pieces, for coloring. Obviously, this is not a full seven color rainbow if you’re only doing for colors. Feel free to divide your mochi into more pieces to do more colors. Or do less. I just didn’t want to bother with the hassle of an extra three colors, and I found that four colors had the same general rainbow effect.
Working one at a time, add a drop of food coloring to each and knead to evenly disperse. Keeping your hands and cutting board slightly damp will keep the mochi from sticking. BUT if you add too much water, your mochi will become totally mushy and stick everywhere, so use as little as possible. If you do find that your mochi is too wet, you can add potato starch to keep it from mushing everywhere. General rule of thumb: you want to keep your mochi texture at about the firmness of your ear lobe.
Please note that if you use regular food coloring, just one drop will result in a very light color. I recently switched to use Americolor gel food coloring, which gives a very strong color in just one drop and does not add excess moisture to my mochi.
Roll each colored dough into a long snake, about 18 inches. Cut each snake in half so you get two long stripes of each color.
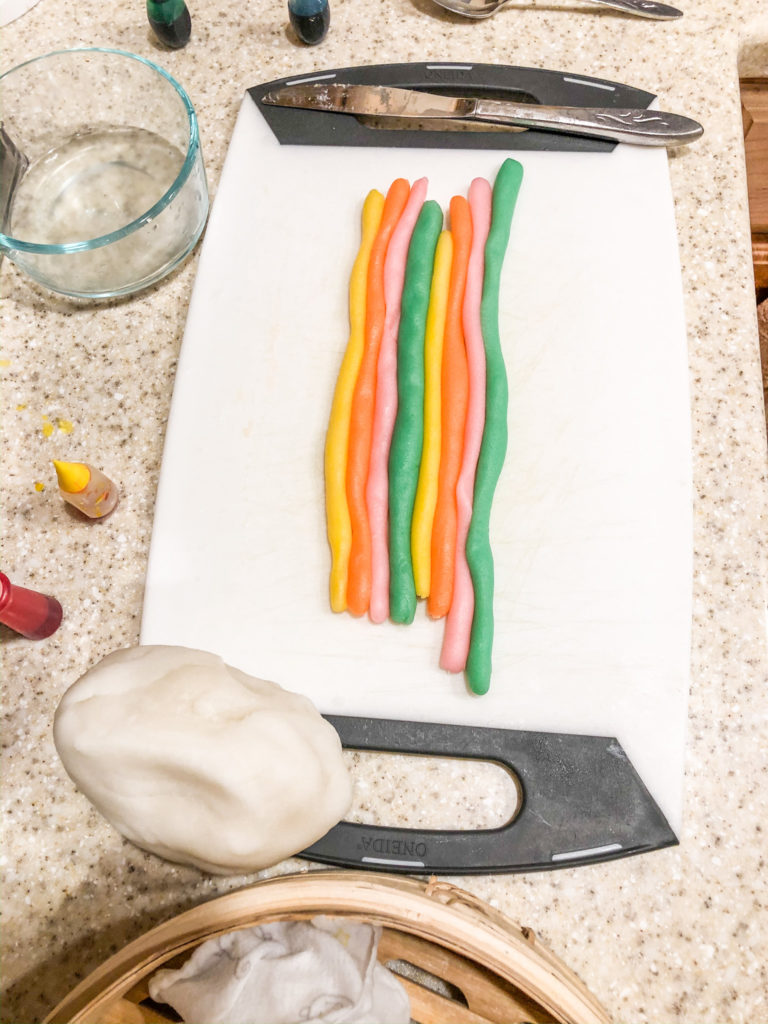
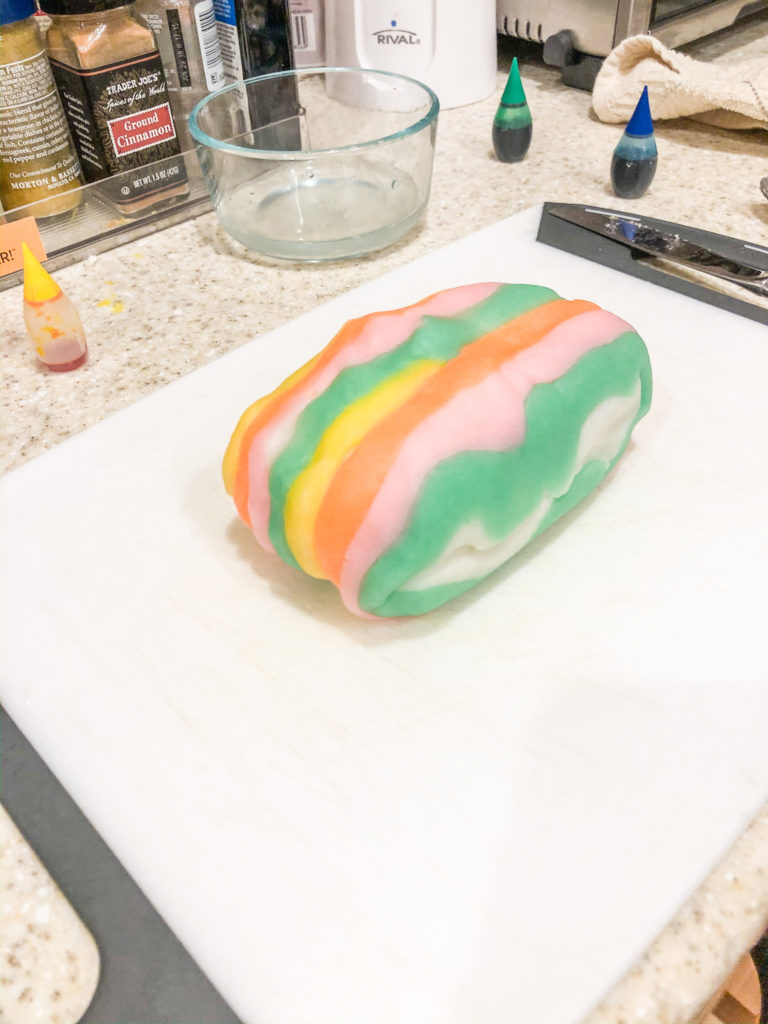
Alternate the colors of your mochi snakes to create a rainbow rectangle. This will become the outer skin of your mochi log. Place the remaining 1/2 chunk of white mochi on top of your rainbow rectangle. Roll your mochi log so the colored stripes wrap all around the middle white portion and pinch the edges to seal the outer rainbow together. If you find that your stripes aren’t sticking to each other or to your white mochi, use some water to make your mochi sticky again.
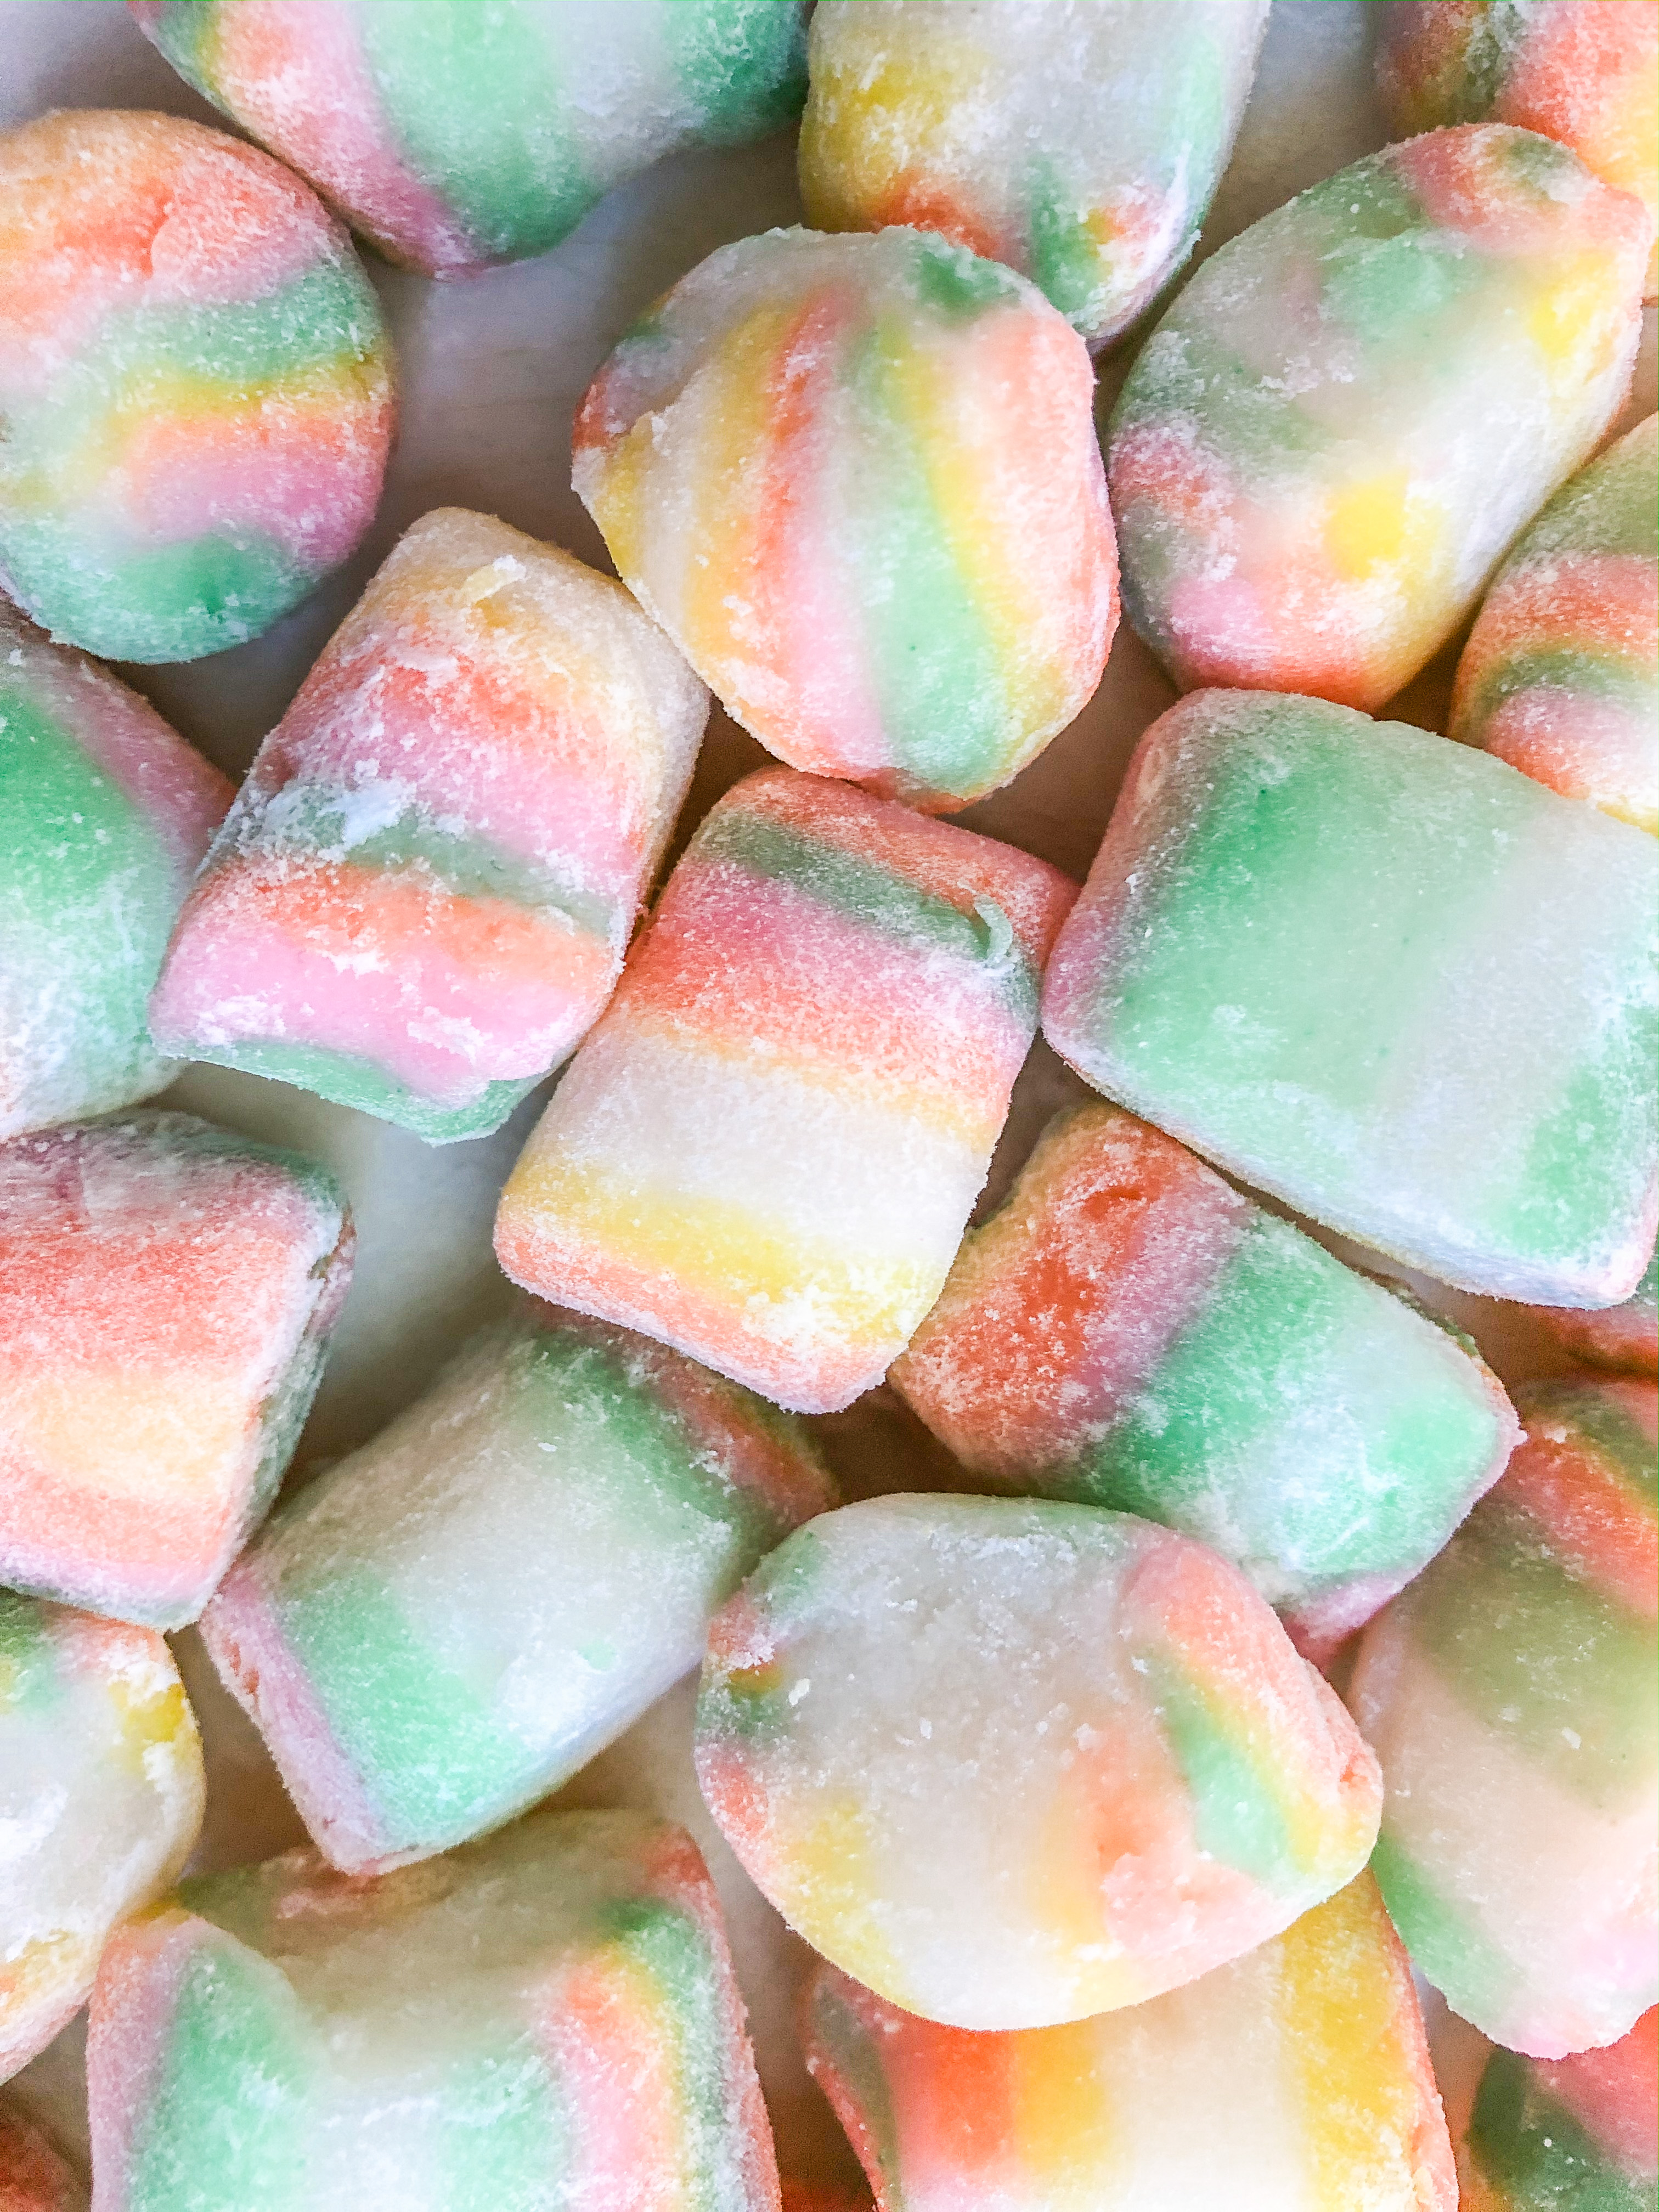
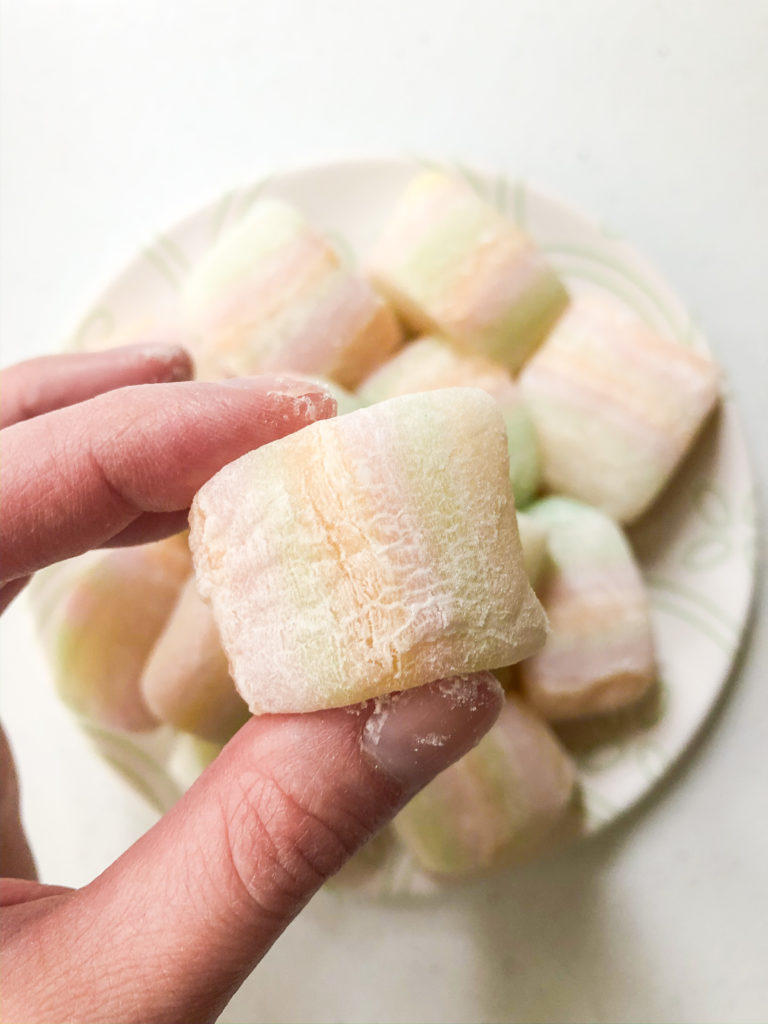
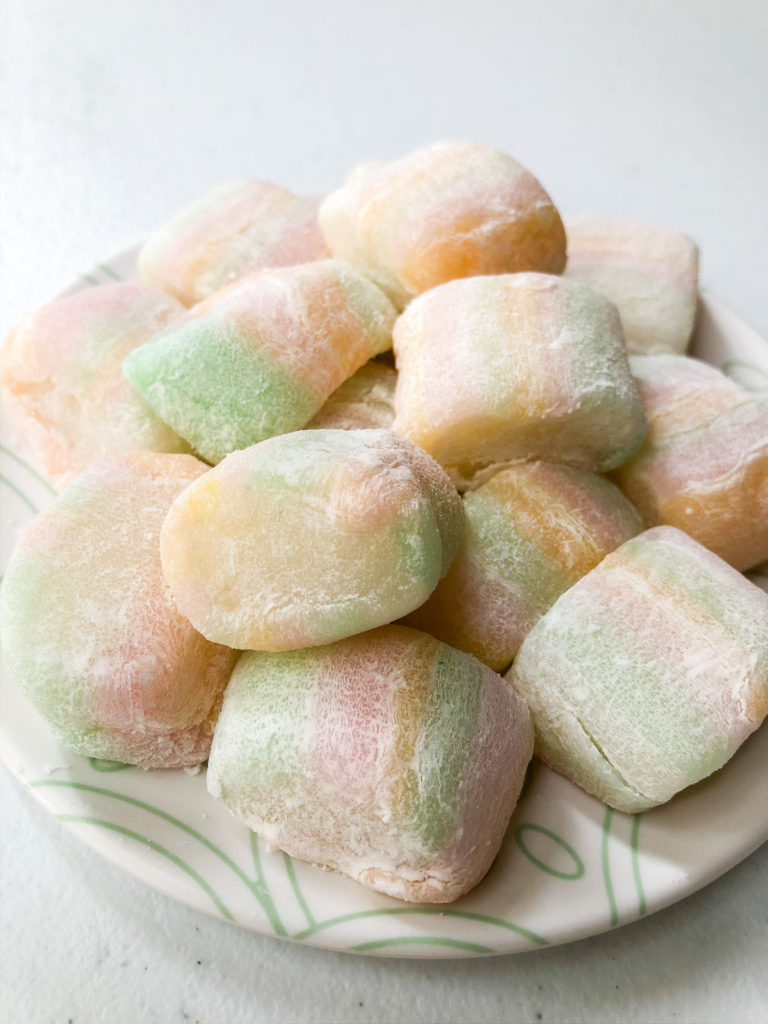
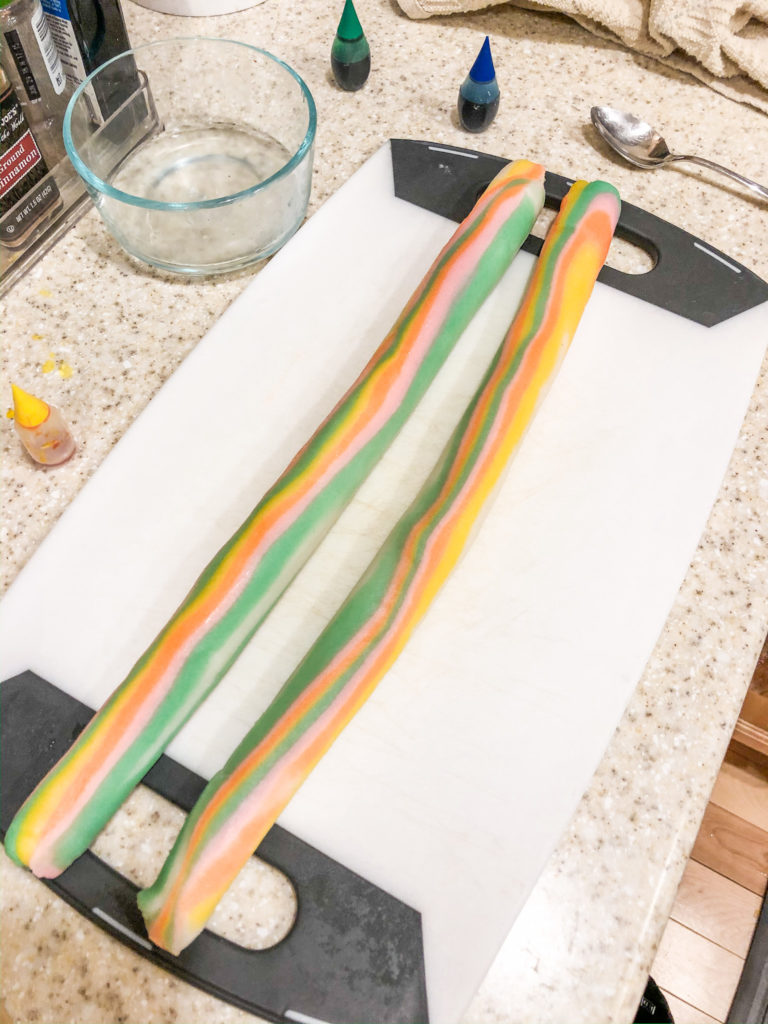
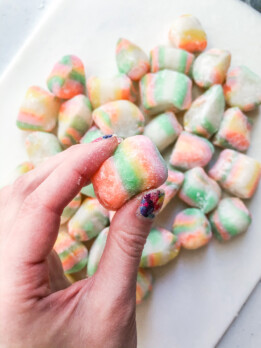
Now roll your giant mochi into a long log. From here you will slice your mochi log into little pieces, so you can choose to make your mochi as big or small as you want. I like to roll my mochi until it’s about as thick as a marshmallow. Slice into little mochi pillows and toss in katakuriko to prevent from sticking.
And you’re done! How’d it go? Feel free to watch that first youtube video to get a better sense of how to align the colors and roll the mochi. You can also practice on some play-dough too. Let me know if you have any questions in the comments below! Wishing you all a safe and healthy quarantine season.

More Mochi Recipes:
Are you looking for more pretty mochi recipes? Or maybe you’re a little intimidated and want to try something easier? Check these out:
Rainbow Mochi
Ingredients
- 1 cup mochiko, (120g)
- 1/2 cup sugar, (100g)
- 1/2 cup water
- 1/4 cup coconut milk, optional, see notes
- 1/2 tsp extract of choice (vanilla, coconut, almond), optional, see notes
- food dye, various colors
- katakuriko (potato starch), for dusting
Instructions
- Whisk the flours and sugar.
- Add water. Add coconut milk and extract at this time too, if using.
- Steam for 15 minutes in any sort of steamer. OR microwave in a well covered dish for two minutes and 30 seconds. I usually check for doneness and stir after two minutes.
- Turn out the cooked mochi onto a cutting board or silicone mat and knead into a log. Be careful, as it will be very hot.
- Cut 1/2 of the log to dye. Keep remaining 1/2 covered so it doesn't dry out.
- Cut the 1/2 chunk of mochi into 4 equal pieces (or however many colors you want). Working one at a time, place one drop of food coloring on each piece and knead to evenly combine. Keep any pieces you're not kneading covered with a damp cloth. Keep hands moistened with water to keep from sticking, but do not add any more water than necessary or the dough will become too soft and sticky. If your dough starts becoming too wet, use katakuriko to keep it from sticking to your kneading surface.
- Roll each colored mochi into a thin noodle about 18 inches long. Cut each noodle in half so you have two stripes of each color.
- Arrange the colorful stripes to create a rainbow of alternating colors that form a rough rectangle. Please see pictures in blog post above for more detail.
- Place the remaining white mochi log on top of your rainbow.
- Wrap the edges of the rainbow around the white mochi, pinching to seal.
- You should now have a fat mochi log with rainbow colors on the outside and white on the inside. Roll this log into a thin, long log to your desired thickness and slice into pieces. I like mine to be about marshmallow sized.
- Toss the pieces in katakuriko to prevent them from sticking and store any leftovers in an airtight container at room temperature.
Notes
- Coconut milk will make your mochi stay moist for longer, which is good if you want to keep your mochi over a couple days. However, it does make the mochi more soft and will be flat, instead of a bouncy pillow shape. See blog post explanation above for more information on why coconut milk is an optional ingredient.
- I sometimes like to add flavored extracts just for fun. It’s totally optional and up to you.
Pingback: Rainbow Deco Swiss Roll Inspired by Sugar Rush Netflix | Mochi Mommy
Pingback: Three Layer Mochi (Girls' Day Chi Chi Dango) - Mochi Mommy
Hello, I was wondering if someone actually tried to find dosages for this recipe since i’ve stumbled upon the video as well. Glad to see you tried it out! Looks great! Have you considered making daifuku mochi with rainbow paste?
Pingback: Purple Sweet Potato Cinnamon Rolls - Mochi Mommy
I have no idea how the rainbow dango from Fugetsu-Do looks so perfect. There’s video of it being made, and I can’t for the life of me figure out how they managed to roll it together without a ton of dusting starch (other than for the final cut) and without it just sticking to their hands and to the board. They’ve really mastered it.
I have tried various recipes for microwave mochi, and they work OK. I could try using a steamer instead. I have found that the rice flour is very important. I cheaped out the first time and used Thai glutinous rice flour (Erawan brand although the other big brand is Three Ladies). They apparently wet mill it, and it’s also a long grain variety as opposed to a Japanese short/medium grain type. It ended up way too soft and needed less water to be workable. The Thai flour also had a non-neutral taste. And frankly too smooth and not as chewy. But then I tried using Koda Farms Blue Star Mochiko and it reminded me more of the mochi I’ve bought from places like Fugetsu-Do as far as texture goes. I would also throw in a plug for other great places for mochi like Sakura-Ya and Chikari in Gardena, as well as Osakaya in Sacramento.
Pingback: 8 Christmas Gift Ideas for Home Bakers and Cooks - Mochi Mommy
You said that you originally made this as a suama recipe. Can I use this same recipe to make suama by just replacing the mochiko with a like amount of joshinko, or do the proportions change? I have fond memories of suama from my childhood and would like to try making some.
Hi! I haven’t tested it with joshinko, so I’m not sure it’s exactly the right amount of water, but it should be generally close. I’d say it’s worth giving a try! Since suama usually only has two different colors, you can split the batter and dye one pink before steaming, if that makes sense, instead of kneading the color into it afterwards. Then assemble by wrapping the pink around the white and rolling into a log. Sorry if those instructions are confusing.